In more complex forms than eggs (something that
has more than just one rounded surface) shadows can be
drawn by making contour shapes and then filling them in
with varying grades of shadows.
 |
|
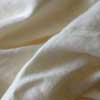
Try drawing a wrinkled cloth |
 Take
a towel, shirt, or silk handkerchief and mound it up on
your desk. It should be a larger piece of cloth so you
can get nice, flowing, deep folds and creases. Put one
single light source on it and just look at the
highlights and shadows that are shown in the heap. See
how there are hills and valleys created in the wrinkles?
And do you see that the "valleys" are in shadow? Can you
see that you can draw the shadows in the valleys as
shapes here? Remember, if you draw shapes, your logical
mind isn't going to protest too much because you're not
drawing anything it knows. Take
a towel, shirt, or silk handkerchief and mound it up on
your desk. It should be a larger piece of cloth so you
can get nice, flowing, deep folds and creases. Put one
single light source on it and just look at the
highlights and shadows that are shown in the heap. See
how there are hills and valleys created in the wrinkles?
And do you see that the "valleys" are in shadow? Can you
see that you can draw the shadows in the valleys as
shapes here? Remember, if you draw shapes, your logical
mind isn't going to protest too much because you're not
drawing anything it knows. Try to draw your mounded up
towel without your picture frame to guide you. Start by
picking a prominent shadow-shape somewhere near the
center of the mound and draw it's outline. Now move to a
shape near the shape you just drew and draw the contour
shape there. Keep in mind the "negative space" between
the shapes and measure the distance and angles from
shape to shape. You might want to draw several shapes
before you start shading them all in so you can get the
negative spaces correctly spaced. When you have several
of the key shapes drawn, go ahead and start shading in
the shapes. The shadow shapes you're filling in will not
be all the same tone. The shadows that are closer to the
light source will be darker than the shadows further
away. The shadows will also not be the same tone within
the same shadow-shape. Keep that in mind when you're
shading. This is a bit more complicated than an egg, but
it's a heck of a lot more fun, too. Let's take a more
in-depth look at
shading
in the nest section. |