|
|
|
Click to enlarge |
 |
 |
|
Click to enlarge |
Many
people get thrown when they need to draw a hand with
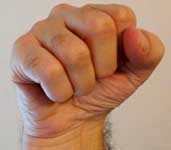
some or all of the fingers clenched. A fist or a
pointing finger oftentimes freaks people out. If you
mentally break the fingers down into the cylindrical
segments like we did previously, the drawing will become
easier to execute. Look at the fist image to the left for
example.
Click it to see a larger image that you can
print out if you'd like. You can only see two of the
three finger segments on any given finger, and the
second segments are somewhat two dimensional. The first
segments do have some roundness to them. If you
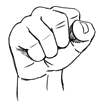
visualize in your head breaking the fingers up like the
image to the right, you should better understand how the
fingers are curled, and it should be easier to draw. An error that many people make when
drawing fingers is to draw them all alike - the same
length, and the same thickness. The fingers aren't clones of
each other. Look at your own hand. Notice that the
middle finger is not only the longest, but it's also the
widest. The second widest finger should be your index
finger, then the ring finger then the pinky.
Click the
image to the right to see what I mean.
 |
|
Click to enlarge |
 So
when drawing clenched fingers, their length and width
obviously don't change from when the hand is laid flat,
so keep that in mind when drawing clenched fingers.
Since the middle finger is the longest, it's going to
stick out when curled more than the other three fingers.
The middle finger also has the largest knuckle of the
hand, so that knuckle will peak above the other
knuckles. Also keep in mind the fact that the fingers
aren't all the same width. Go ahead and try and draw the
fist image. It may be easiest to draw the
contours of
the fingers as a group like we did earlier and then
break up that shape into the individual fingers. Click
on the
fist sketch to see how I drew it. So
when drawing clenched fingers, their length and width
obviously don't change from when the hand is laid flat,
so keep that in mind when drawing clenched fingers.
Since the middle finger is the longest, it's going to
stick out when curled more than the other three fingers.
The middle finger also has the largest knuckle of the
hand, so that knuckle will peak above the other
knuckles. Also keep in mind the fact that the fingers
aren't all the same width. Go ahead and try and draw the
fist image. It may be easiest to draw the
contours of
the fingers as a group like we did earlier and then
break up that shape into the individual fingers. Click
on the
fist sketch to see how I drew it.
|
