In drawing, there are several ways to go about
shading, there are many techniques of shading. What
technique you use depends on what your goal for your
drawing is. Are you going for a realistic look, or a
cartoon-like look, or something in-between - something
not realistic, but rather surreal, unreal, fantastical
or "artsy-fartsy". In addition, how you'll do the shading will depend on the type
of surface you want to draw. An object's texture will
determine how you draw the shading on the object. For
example, you'll draw shading differently if you were
drawing a leaf than if you were drawing a chromed metal
pipe.
 |
|
Click to enlarge |
 |
 |
|
Click to enlarge |
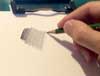
Let's look at Basic Shading first. The
most basic shading would be moving your pencil back and
forth in an area of your drawing that lays down the
graphite of your pencil onto the paper. So lets assume
you're drawing the cube I showed you on the previous
page. The faces of that cube are smooth and hard, so the
shading you'd draw would also have to look smooth and
hard, and the
gradient of the shadow would be fairly
even on each face of the cube. You want the shading to
create a smooth gradient, so the fatter you can make a
single stroke of your pencil, the smoother the shading
will look. If the lead of your pencil is blunt, you can
get a smoother, fatter line than if your pencil was
sharp. Click the image to the right to see what kind of
shading quality you can get with a more blunt pencil lead.
Does this mean that your pencil should always be blunt
when shading? No, but whether your lead is sharp or more
blunt will change the way your shading looks. We'll look
at shading with a sharper lead a little later on.
You'll be adding shading to your drawing after you've
drawn in the
contours of the shapes of your subject. So
if you sharpened your pencil when you started the
drawing, your pencil may be blunt enough now so that you
can get the quality of shading that you want. But if
your pencil isn't blunt enough, just grab a new scratch
sheet of paper and draw some shading to dull the lead
the way you want it.
 |
|
Click to play Video |
|
|
 |
|
Click to enlarge |
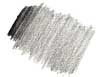
 Being
able to lay down graphite in an even tone takes
practice. So let's do that - practice. Put a clean sheet
of paper on your drawing board and sharpen your pencil.
Begin by making back and forth strokes about two
inches wide as tightly and as close together as you can.
Since your pencil is sharp, the lines will be pretty
thin and dark, but keep drawing until the lines start to fatten
up meaning that your pencil is beginning to dull. Let up
on the pressure on the pencil a little to lighten up the
lines. Try
and make all the lines the same tone by keeping the same
pressure on your pencil. Keep going until you're
comfortable with the movement. Try again and this time
don't sharpen your pencil so you start with a dull lead.
Try and do the same thing as before - a smooth even
tone. Once you get there, vary the pressure on the
pencil to darken (more pressure) and lighten (less
pressure) the shading that you're creating. The image to
the right is the shading exercise from the video. You
can see the even tone that was created once the pencil
dulled. Being
able to lay down graphite in an even tone takes
practice. So let's do that - practice. Put a clean sheet
of paper on your drawing board and sharpen your pencil.
Begin by making back and forth strokes about two
inches wide as tightly and as close together as you can.
Since your pencil is sharp, the lines will be pretty
thin and dark, but keep drawing until the lines start to fatten
up meaning that your pencil is beginning to dull. Let up
on the pressure on the pencil a little to lighten up the
lines. Try
and make all the lines the same tone by keeping the same
pressure on your pencil. Keep going until you're
comfortable with the movement. Try again and this time
don't sharpen your pencil so you start with a dull lead.
Try and do the same thing as before - a smooth even
tone. Once you get there, vary the pressure on the
pencil to darken (more pressure) and lighten (less
pressure) the shading that you're creating. The image to
the right is the shading exercise from the video. You
can see the even tone that was created once the pencil
dulled.
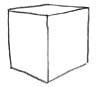
Now that you're warmed up, let's draw the wood cube from
the top of the page. Draw the contour of the cube first. Just
freehand it, don't bother measuring it. You should come up with
something like this at right. If you remember our
discussion about light and shadow, you'll remember that
there are usually three main tones visible on an object:
the Highlight, the midtone and the shadow. Drawing cubes
is handy because if the faces of the cube are smooth,
there should be only one tone per face of the cube. This
cube has three faces, and each face has a different
tone. The top face shows the midtone, the left face
shows the highlight, and the right face is the shadow
tone. The light source is almost shining directly on the
left face, so that's why that face is the highlight. The
top face is not in shadow or directly in the light
(highlight) so that face shows the midtone. The right
face is furthest away from the light so it's in shadow.
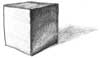
Using what you practiced from above, shade in the three
faces of the cube. I'd start with the top face first
because it's the midtone. So what ever tone you draw on
that face you'll know that the shadow tone has to be
darker, and the highlight tone has to be lighter. Try
and make each tone as even as you can. The highlight
tone is the most difficult because you'll have to have a
very light touch on the pencil to get a very light tone.
Yes, you should really shade in the highlight face,
because that face is a darker shade than the background
(your paper). After you've shaded in the three faces,
you can call it done. But if you look closely at the
photo you're working from, you'll see that the shadow
face is not even. The edges are slightly darker than the
middle. To darken those areas, use the same motion as
you did before and go over the shading you've already
drawn. Lay down more graphite to create a darker shadow.
Shade in the same direction that you shaded before,
don't go against the direction that you've already laid
down. So... why are the edges of the shadow face
darker than the middle? Look at the photo and see if you
can discover why.
|