|
|
Click to enlarge |
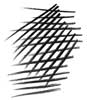
Another technique when shading is called
crosshatching. Crosshatch shading is basically
creating the illusion of shadow by grouping several
lines together. You draw several lines, then on top of
those lines draw another grouping of lines that are at
an opposing angle to the first group of lines. I see
crosshatching used more when the artist is working in
ink, not graphite. This shading technique is used to
great effect in comic books, newspaper strips and other
types of art that will be printed. The previous shading
techniques we discussed are mostly used with pencils,
where you can get middle grey tones. Crosshatching is
used most when you are working with two colors only -
black ink on white paper. With ink you can't get a
middle grey tone, you have black (or whatever color the
ink is) only, so crosshatching is used to create the
illusion of grey. Where the lines intersect it
appears as though there is a darker shadow than
where the lines don't intersect.
 |
|
Click to see crosshatching |
 |
 |
|
Click to enlarge |
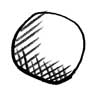
 Crosshatch shading is fairly simple to do, but it's
not so easy to master. All you do is draw lines where
you want to create shadow, then draw more lines on top
of those lines to create darker shadow. The lines should
be as straight and equidistant from each other as you
can manage. But unlike the examples shown here,
crosshatching isn't just floating around on your paper
by itself, it's shading, it should be on an object that
you are shading. So, to start, draw the contour of your
shape. Then you draw some initial crosshatching lines
that conform to the object's shape. For example, say you
want to draw a sphere and crosshatch it's shading. First
draw the circle. Then you should draw your first set of
crosshatched lines in in a crescent shape along the
contour of the circle. The crescent shape denotes where
the shadow is on the sphere, you don't want to draw the
lines all the way across the circle because that would
mean the whole sphere is in shadow. Once you have the
crescent shape with your crosshatching lines, draw
opposing crosshatch lines at the bottom of the sphere
which indicates the darker shadow is at the bottom of
the sphere. The uncrossed line at the top of the sphere
denotes the midtone shade in this sphere. You can draw
as many sets of opposing lines as you like, the more
lines you have the darker the shadow will appear at the
points where all your lines intersect. Crosshatch shading is fairly simple to do, but it's
not so easy to master. All you do is draw lines where
you want to create shadow, then draw more lines on top
of those lines to create darker shadow. The lines should
be as straight and equidistant from each other as you
can manage. But unlike the examples shown here,
crosshatching isn't just floating around on your paper
by itself, it's shading, it should be on an object that
you are shading. So, to start, draw the contour of your
shape. Then you draw some initial crosshatching lines
that conform to the object's shape. For example, say you
want to draw a sphere and crosshatch it's shading. First
draw the circle. Then you should draw your first set of
crosshatched lines in in a crescent shape along the
contour of the circle. The crescent shape denotes where
the shadow is on the sphere, you don't want to draw the
lines all the way across the circle because that would
mean the whole sphere is in shadow. Once you have the
crescent shape with your crosshatching lines, draw
opposing crosshatch lines at the bottom of the sphere
which indicates the darker shadow is at the bottom of
the sphere. The uncrossed line at the top of the sphere
denotes the midtone shade in this sphere. You can draw
as many sets of opposing lines as you like, the more
lines you have the darker the shadow will appear at the
points where all your lines intersect.
 |
|
Click to enlarge |
Notice on the sphere I drew the bottom of the circle with a heavier line than
the top of the circle? That's another type of shading technique that I touched
on briefly earlier in
the
DRAWING BASICS section. What
I mentioned was when you're drawing the contour shapes in your drawing, a simple
way to hint at shadow on the shape is to vary the thickness of the line that
you're drawing to create the contour shape. This creates a feeling of substance
to the object, like the object has weight and isn't just floating in white space
(your paper). It's easy to do - where ever there is a shadow on the object, just
thicken the line there. Usually, if you thicken the lines at the bottom of the
object, that will create the illusion of weight for the object. This is because
in the real world most objects are sitting on some sort of a base; be it the
floor, the ground, a shelf, or in your hand (for small objects). Darkening the
bottom lines of the object makes it look like the object is sitting on a base
because it appears as though the bottom of the object is touching another object
- namely it's base.
|